Kubernetes(K8S) 使用详细教程
Kubernetes(K8S) 使用详细教程
Kubernetes 概述
Kubernetes(简称 K8s)是一个开源的容器编排平台,用于自动化应用程序的部署、扩展和管理。它由 Google 在 2014 年开源,现在是 Cloud Native Computing Foundation (CNCF) 旗下的旗舰项目。
为什么需要 Kubernetes?
- 容器编排:管理大量容器化应用的生命周期
- 自动扩缩容:根据负载自动调整资源
- 自我修复:容器故障时自动重启或重新调度
- 负载均衡:内置服务发现和负载均衡
- 持续部署:支持滚动更新和回滚
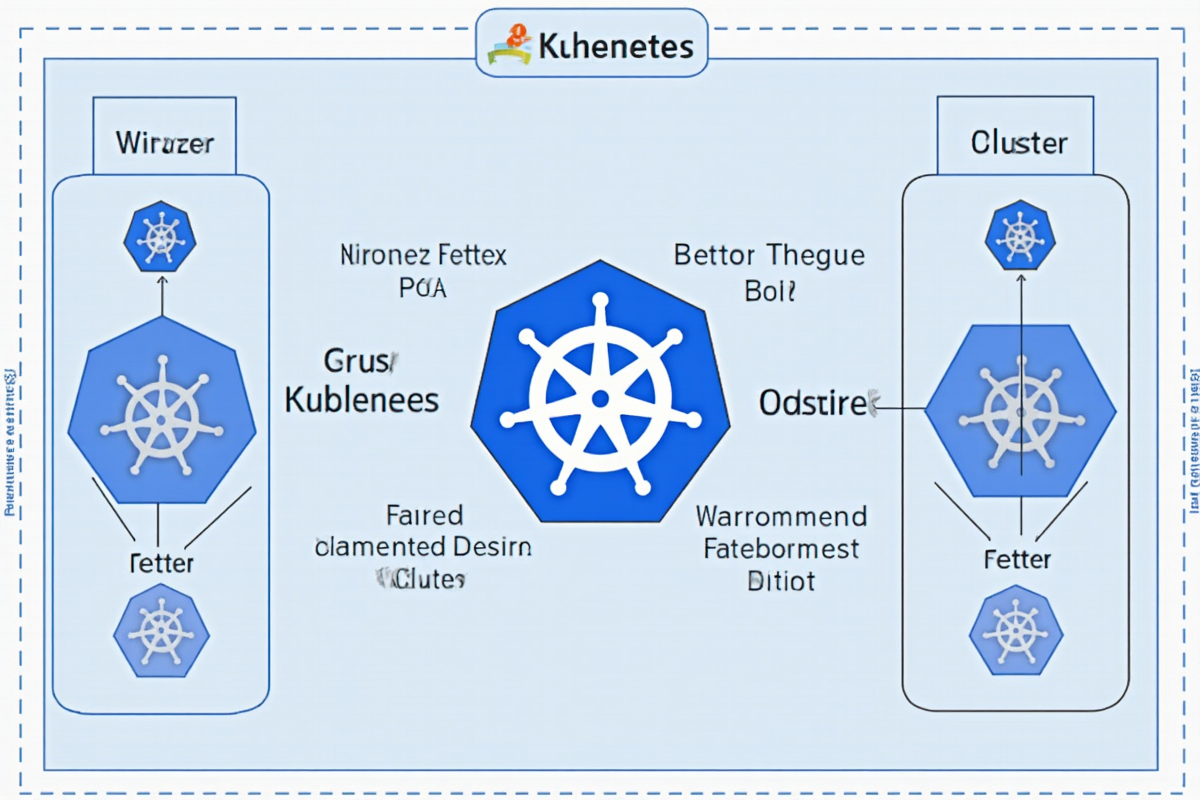
K8s 核心架构
┌─────────────────────────────────────────────────────────┐
│                     控制平面(Control Plane)            │
│  ┌─────────────┐  ┌─────────────┐  ┌─────────────┐    │
│  │   API Server │  │   Scheduler │  │  Controller │    │
│  └──────┬──────┘  └──────┬──────┘  └──────┬──────┘    │
│         └────────────────┼────────────────┘             │
│                        ┌─▼──┐                          │
│                        │Etcd│                          │
│                        └────┘                          │
└─────────────────────────────────────────────────────────┘
                          ↓
┌─────────────────────────────────────────────────────────┐
│                     工作节点(Worker Nodes)             │
│  ┌─────────────┐  ┌─────────────┐  ┌─────────────┐    │
│  │   Kubelet   │  │   Kube-proxy│  │   Container │    │
│  └─────────────┘  └─────────────┘  │    Runtime  │    │
│                                    └─────────────┘    │
└─────────────────────────────────────────────────────────┘
控制平面组件:
- API Server:K8s 的核心 API 接口,所有操作都通过它
- Scheduler:负责将 Pod 调度到合适的节点
- Controller Manager:管理各种控制器,如 Deployment、ReplicaSet
- Etcd:分布式键值存储,保存集群所有状态
工作节点组件:
- Kubelet:节点代理,管理 Pod 生命周期
- Kube-proxy:维护网络规则和负载均衡
- Container Runtime:容器运行时(Docker、containerd 等)
核心资源对象
1. Pod(基本单位)
Pod 是 K8s 中最小的调度单元,一个 Pod 可以包含一个或多个容器。
“`yaml
apiVersion: v1
kind: Pod
metadata:
name: my-app-pod
labels:
app: my-app
spec:
containers:
- name: nginx
image: nginx:1.21
ports:
- containerPort: 80
resources:
requests:
memory: “64Mi”
cpu: “250m”
limits:
memory: “128Mi”
cpu: “500m”
livenessProbe:
httpGet:
path: /health
port: 80
initialDelaySeconds: 10
periodSeconds: 5
readinessProbe:
httpGet:
path: /ready
port: 80
initialDelaySeconds: 5
periodSeconds: 3
2. Service(服务发现)

Service 为 Pod 提供稳定的网络访问入口,实现负载均衡和服务发现。
yaml
apiVersion: v1
kind: Service
metadata:
name: my-service
spec:
selector:
app: my-app
ports:
- protocol: TCP
port: 80
targetPort: 8080
type: ClusterIP # ClusterIP, NodePort, LoadBalancer, ExternalName
Service 类型:
- ClusterIP:集群内部访问(默认)
- NodePort:在每个节点上开放端口
- LoadBalancer:创建外部负载均衡器
- ExternalName:映射到外部 DNS 名称
3. Deployment(部署管理)
Deployment 管理无状态应用的部署,支持滚动更新和回滚。
yaml
apiVersion: apps/v1
kind: Deployment
metadata:
name: my-deployment
spec:
replicas: 3
selector:
matchLabels:
app: my-app
template:
metadata:
labels:
app: my-app
spec:
containers:
- name: nginx
image: nginx:1.21
ports:
- containerPort: 80
Deployment 命令操作:
bash
创建 Deployment
kubectl apply -f deployment.yaml
查看 Deployment 状态
kubectl get deployments
滚动更新
kubectl set image deployment/my-deployment nginx=nginx:1.22
回滚更新
kubectl rollout undo deployment/my-deployment
查看更新历史
kubectl rollout history deployment/my-deployment
查看更新状态
kubectl rollout status deployment/my-deployment
4. ConfigMap(配置管理)

ConfigMap 将配置信息与应用程序分离。
yaml
apiVersion: v1
kind: ConfigMap
metadata:
name: app-config
data:
APP_ENV: production
LOG_LEVEL: info
DB_HOST: database-service
在 Pod 中使用 ConfigMap:
yaml
spec:
containers:
- name: my-app
image: my-app:1.0
envFrom:
- configMapRef:
name: app-config
# 或者单独指定
env:
- name: APP_ENV
valueFrom:
configMapKeyRef:
name: app-config
key: APP_ENV
volumeMounts:
- name: config-volume
mountPath: /etc/config
volumes:
- name: config-volume
configMap:
name: app-config
5. Secret(敏感信息)

Secret 用于存储密码、令牌等敏感信息。
yaml
apiVersion: v1
kind: Secret
metadata:
name: db-secret
type: Opaque
stringData:
username: admin
password: mysecretpassword
或者使用 base64 编码
data:
username: YWRtaW4=
password: bXlzZWNyZXRwYXNzd29yZA==
6. Namespace(命名空间)

Namespace 提供资源隔离,将集群划分为多个虚拟集群。
yaml
apiVersion: v1
kind: Namespace
metadata:
name: production
labels:
env: production
使用 Namespace:
bash
创建命名空间
kubectl create namespace production
查看命名空间
kubectl get namespaces
在指定命名空间操作
kubectl get pods -n production
切换默认命名空间
kubectl config set-context –current –namespace=production
常用 kubectl 命令

集群信息
bash
查看集群信息
kubectl cluster-info
查看节点状态
kubectl get nodes
查看节点详细信息
kubectl describe nodes
查看集群组件状态
kubectl get componentstatus
Pod 管理
bash
创建 Pod
kubectl run nginx –image=nginx:1.21
列出所有 Pod
kubectl get pods
查看所有命名空间的 Pod
kubectl get pods –all-namespaces
查看 Pod 详细信息
kubectl describe pod kubectl logs kubectl logs kubectl logs -f kubectl exec -it kubectl cp bash kubectl create deployment nginx –image=nginx:1.21 kubectl apply -f deployment.yaml kubectl get deployments kubectl scale deployment nginx –replicas=5 kubectl delete deployment nginx bash kubectl expose deployment nginx –port=80 –target-port=80 –type=NodePort kubectl get services kubectl describe service kubectl port-forward svc/my-service 8080:80 bash kubectl create configmap app-config –from-literal=APP_ENV=production kubectl create configmap app-config –from-file=config.properties kubectl get configmaps kubectl describe configmap app-config kubectl delete configmap app-config bash kubectl create namespace dev kubectl delete namespace dev kubectl get all -n dev bash kubectl get events –sort-by=.lastTimestamp kubectl describe pod kubectl top nodes kubectl top pods kubectl logs kubectl debug -it kubectl get pods -o yaml > pod.yaml yaml image: myapp:1.0 resources: targetPort: 8080 yaml image: mysql:8.0 valueFrom: volumeMounts: mountPath: /var/lib/mysql name: data yaml image: myapp:1.0 image: fluentd:latest mountPath: /var/log/app image: prometheus-node-exporter:latest volumes: emptyDir: {} yaml yaml readinessProbe: startupProbe: yaml metadata: selector: bash kubectl create namespace development yaml securityContext: securityContext: 使用 K8s 部署微服务架构,每个微服务作为独立的 Deployment,通过 Service 暴露,实现服务发现和负载均衡。 结合 Jenkins、GitLab CI 等工具,实现自动化构建、测试和部署,支持滚动更新和快速回滚。 在私有云和公有云之间部署 K8s 集群,实现资源弹性伸缩和容灾备份。 使用 K8s 调度 GPU 节点,批量处理 AI 训练任务,支持任务队列和资源池化。 部署 Prometheus + Grafana 监控体系,配合 Fluentd/Fluent Bit 实现日志收集和分析。 — 总结:Kubernetes 是云原生时代的事实标准,掌握 K8s 的核心概念和操作方法,将大大提升你的容器化应用管理能力。建议多实践,熟悉 kubectl 命令,理解 YAML 配置,逐步掌握更高级的 K8s 特性。 下一步学习:查看 Pod 日志
查看指定容器的日志
实时查看日志
进入容器执行命令
复制文件
kubectl cp /local/path
部署管理
创建 Deployment
应用配置
查看 Deployment
扩缩容
删除 Deployment
Service 管理
创建 Service
查看 Service
查看 Service 详细信息
端口转发
kubectl port-forward pod/nginx-pod 8080:80
配置管理
创建 ConfigMap
从文件创建 ConfigMap
查看 ConfigMap
查看 ConfigMap 内容
删除 ConfigMap
命名空间操作
创建命名空间
删除命名空间
查看命名空间资源
故障排查
查看 Pod 事件
查看 Pod 详细状态
查看节点资源使用情况
查看 Pod 资源使用情况
查看日志(多行)
进入容器调试
导出配置
kubectl get pods -o json > pod.json
部署场景与最佳实践

场景一:Web 应用部署
apiVersion: apps/v1
kind: Deployment
metadata:
name: web-app
spec:
replicas: 3
selector:
matchLabels:
app: web-app
template:
metadata:
labels:
app: web-app
spec:
containers:
ports:
requests:
memory: “256Mi”
cpu: “250m”
limits:
memory: “512Mi”
cpu: “500m”
livenessProbe:
httpGet:
path: /health
port: 8080
initialDelaySeconds: 15
periodSeconds: 10
readinessProbe:
httpGet:
path: /ready
port: 8080
initialDelaySeconds: 5
periodSeconds: 5
—
apiVersion: v1
kind: Service
metadata:
name: web-app-service
spec:
selector:
app: web-app
ports:
type: LoadBalancer
场景二:数据库部署
apiVersion: apps/v1
kind: StatefulSet
metadata:
name: mysql
spec:
serviceName: mysql
replicas: 3
selector:
matchLabels:
app: mysql
template:
metadata:
labels:
app: mysql
spec:
containers:
env:
secretKeyRef:
name: mysql-secret
key: root-password
ports:
volumeClaimTemplates:
spec:
accessModes: [“ReadWriteOnce”]
resources:
requests:
storage: 10Gi
场景三:多容器 Pod
apiVersion: v1
kind: Pod
metadata:
name: sidecar-pattern
spec:
containers:
ports:
volumeMounts:
ports:
最佳实践

1. 资源限制
resources:
requests:
memory: “256Mi”
cpu: “250m”
limits:
memory: “512Mi”
cpu: “500m”
2. 健康检查
livenessProbe:
httpGet:
path: /health
port: 8080
initialDelaySeconds: 15
periodSeconds: 10
httpGet:
path: /ready
port: 8080
initialDelaySeconds: 5
periodSeconds: 5
httpGet:
path: /startup
port: 8080
failureThreshold: 30
periodSeconds: 10
3. 标签与选择器
定义标签
labels:
app: my-app
env: production
tier: frontend使用选择器
matchLabels:
app: my-app
env: production
4. 命名空间隔离
按环境划分命名空间
kubectl create namespace staging
kubectl create namespace production
5. 安全实践
使用非 root 用户运行
runAsNonRoot: true
runAsUser: 1000
runAsGroup: 1000
fsGroup: 1000只读根文件系统
readOnlyRootFilesystem: true
“`实际应用场景
场景一:微服务架构
场景二:持续部署(CI/CD)
场景三:混合云部署
场景四:AI/ML 训练
场景五:日志与监控

发表评论